the small town chef

Monday, April 4, 2011

dill cheese buns, or plain dinner rolls


these dill cheese buns pair perfectly with any soup, but borscht is always my first choice. they also soak up beer really well after a hockey game, just ask my team. and as for the regular buns, this batch was used as a side for a roasted chicken dinner, but what i really make them for is an afternoon snack. i make little butter and jam sandwiches and have them with tea. it is an instant time warp to being about 6 years old and spending time with my great grandma. i guarantee every great grandchild of hers thinks of fresh bread, butter and jam the same way.


i got this particular bun recipe from a friend - and it is so, so, so good. it's basically the perfect, homemade comfort food. and it was originally her (ukrainian) mom's recipe, so that automatically makes it worthy.

so here, i try to do it justice. the good news is that it's really easy. i love these cheesy dill buns? dill cheese buns? whatever you call them, they're better than you think they will be. and they totally deserve this photo essay/tutorial.


first, dissolve the sugar in the (hot tap) water. then let it cool until just warm.


then sprinkle in the yeast.


while the yeast reconstitutes, get your flour mixture, egg and oil ready.
i'm all about the mise en place.


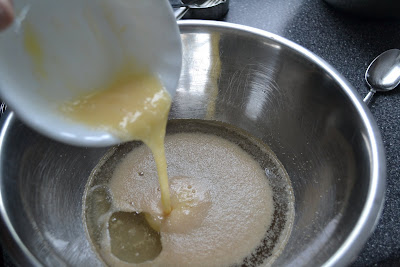
when the yeast is warm and happy, add the oil.


and the egg.


and about 3/4 of the flour/salt mixture.


mix it together, adding more flour if necessary, until it resembles a sticky dough. it should pull away from the counter easily, but will still stick to your hands. place the dough in a clean, lightly oiled bowl, cover it, and put it in a warm spot for it to rise. check the instructions on your yeast package for rising times.

after the dough has risen, gather your assistant(s), cause this is their favourite part.


roll the dough out on a floured surface and punch it down/knead it for a few minutes. seriously, just a few. or throw it in your kitchen aid mixer while you grate some cheese and get the dill out of the freezer. (ain't no fresh dill around these parts in march.)


when the dough has had it's work out, start rolling out the buns. i can be a little, ah... ocd about cooking sometimes, so weighing out my buns makes me very happy. and 1.8 oz. is my favourite number for buns.


flatten out the dough using the palm of your hand and add a pinch of cheese and a pinch of dill. make sure you don't flatten it too thin, because you don't want these to burst while baking.


fold it over and pinch it together, sealing it well.

then roll it into a little ball, like so:

place it seam side down. then do that 19 more times.


after you have them all rolled up, gently cover the buns with a clean towel, and place them back in a warm place to rise for another half hour. this batch wasn't all dill and cheese, so i made sure to mark which rows were them.


after they've risen, add another pinch of dill and cheese to the tops, being careful not to disturb any of the buns too much and risk deflating.

bake at 375 for 10-15 min, rotating the pan once while baking. watch them closely.


i took them out at this point, even though the dill cheese buns could have gone in for another 2 minutes. the plain buns were done, and because i only have one silpat mat, this was how it was going to be. but they still look gorgeous!


and at this point, right out of the oven, i brush the plain buns with butter. but only because a (different) ukrainian mom does that.


beyond delicious.


dinner rolls

  • 1.5 cups warm water
  • 1/4 cup white sugar
  • 1 tbsp yeast
  • 3 tbsp oil
  • generous pinch of salt
  • 1 egg, beaten
  • 4 cups flour
bake at 375 for 10 - 15 min.

Wednesday, December 1, 2010

roasted acorn squash

if i may introduce to you, a perfect side dish.


DSC06552

these little golden nuggets of pure goodness are roasted acorn squash. they are my new staple. and they are a whole food. and they are easy to make.

DSC06526

start by halving it, scooping out the middle, and chopping it up. i have found this is the easiest way to take off the very tough skin.

DSC06528

DSC06532

after this step, use your favourite paring knife to peel the sections like you would a potato. then chop them up into (roughly) bite size pieces.

DSC06538

these are about one inch cubes - and just right for how i want to bake them.

after this step, toss the squash in a bowl with some melted butter, a sprinkle of kosher/sea salt, and a drizzle of agave syrup. if you don't have this syrup, you can use maple syrup or regular pancake syrup.

DSC06556

but i highly suggest you go out and find this stuff. i get mine at costco, and it's two bottles for $12 or something like that. but you can go here to find a store location near you, there are a lot of places you can find their products, even in saskatchewan.

the syrup goes a very long way, and i use it in place of sugar most often when i am cooking now. it's also what we use as a sweetener or syrup with the kids. it has replaced the brown sugar in their porridge and syrup on their pancakes.

DSC06557

and any time you can eliminate refined sugar is huge.

the lighter the syrup (it's really nectar) the lighter the flavour. so this stuff is excellent for adding to foods that you want to sweeten, but not necessarily change the flavour of. for instance, the squash roasted with the nectar vs. the maple syrup will taste very different. both are delicious, but you may not want a maple flavoured side dish with your meal. but then again you may.


after you've tossed the squash with the butter, salt, and nectar, bake in a roasting pan at 400 for 20 minutes. adjust the cooking time based on the size of your squash pieces. but i think this is perfect for achieving the ultimate texture - caramelized nuggets that are a little crisp on the outside, and absolute melt in your mouth in the middle.

DSC06552
yum!

  • one acorn squash, peeled and chopped.
  • 3 tablespoons of butter, melted
  • 3 tablespoons of agave syrup or 4 tablespoons of an alternate syrup
  • 1/2 teaspoon of kosher or sea salt.
combine ingredients in a bowl and toss. place in a roasting pan in a single layer, bake at 400 for 20 minutes or until the squash starts to caramelize and is pierced easily with a fork. serve immediately. give the pan a good shake half way through baking to ensure even roasting.

you can make this dish even simpler by skipping the peeling and chopping stage. after halving and scooping out the squash, drizzle the butter and syrup and then sprinkle the salt over the inside. and roast from there. you will need to at least double the roasting time, and when the squash is cooked thoroughly, you scoop it all out into a bowl and mash together and then serve.

the flavour is still great, and it's simpler than peeling and chopping, but you don't achieve the same texture that the little roasted cubes provide. biting through the sweet and salty skin that is formed during roasting is heaven in your mouth. knee weakening even, and i hope you try it!


and if you really have to, you can substitute olive oil for the butter. it's considered a vegan dish if you do, and it'll be slightly more healthy.

Thursday, November 25, 2010

see look, our grocery store is not that limited anymore.


fantuz flakes and edamame.


still haven't tried the (store brand) edamame yet, will report back when i do.

update: that edamame was really good!

Saturday, October 30, 2010

things i love:

preparing and cooking food, talking about food, taking pictures of food, reading about food, shopping for food, sharing and showing off the food i make. (food meaning food and drink. of course. i love to drink. well, i don't
love to drink, but you know what i mean.)

things i don't like:

this blogging format, how my recipes are
categorized, the blog's name, that my food photography skills are just average, and how i forget to photograph some of the best parts of a recipe. and how i don't blog enough.

so
i'm working on making this blog space better. lists are being made and changes are being implemented. more things about food, more pictures, more recipes. and a better name.

mike and i almost never eat out, other than the golf course, it's only a couple of times a year. we sometimes order a pizza, but since cooking dinner is usually my favourite part of the day and there really aren't a lot of restaurant options around here, we just stay in. and we have small kids. that's what i tell myself anyway when i splurge on something as delectable as this.

that's triple cream brie and black truffles. the truffle shavings are folded into the cream and then a truffle paste is put through the centre of the wedge and then it's left to age. wow.


some people would scoff at a $10 hunk of brie and an $8 sleeve of crackers but it's the little things that keep me sane people. i live in the middle of rural saskatchewan, it's not even november and we've already had a crazy, school closing blizzard. and my pork butt that i ordered at the local grocery store didn't come in, again, and i got that phone call while i was shopping for this stuff.

it's ingredient lists like this that make me warm and fuzzy inside.
broke, but still warm and fuzzy.


when i was paying for my assortment of goodies from this one particular store, the girl at the register asked if i was buying the brie to have with the raincoast crisps. i said i was, and as she wiped a little drool from the corner of her mouth, she told me to enjoy my little slice of heaven and good luck with resisting the urge to come back for more every time i'm within 90 miles. true story.


if i was a good writer, i might be able to communicate to you just how smooth and creamy and delicious and perfect this cheese was. if you like brie, you will love this. and when you try it you will understand why someone would buy cheese that's thirty five bucks a pound. probably.

add a cracker that is really worth it's weight in gold and your favourite german riesling and you will die a thousand deaths of food pleasure. it's combinations like this that the term food porn was coined for. yum.

my favourite white is the wine in the middle, the 2008 selbach. and not just because it's a wine that's featured in the kinette food and wine night that i'm helping organize, but because it's been my go to white wine for as long as i've liked white wine.


this other white (that my aunt mariette is displaying) was consumed at thanksgiving. and it was wonderful. i had two glasses and it was the only bottle (of this specific wine) for like 18 people. finally, my palate is evolving to enjoy white - or maybe just german rieslings?

this wine is from the same area in germany that one of mariette's exchange students is from. andrea - the german - was one of about 14 students that have come through the family. i'll update with that wine's info when i get it.

Monday, April 19, 2010

perfect potato salad

i am officially a potato salad snob after finding this recipe. i made it a million times last summer, and now have it altered to utter perfection.

DSC03319

to be honest, i don't even really like potato salad that much. but this one is the end all and be all of potato salads. it is soooo goooood that once i have it prepared i never get through the rest of my meal prep without ruining my supper by sneaking forkful after forkful.

and please, use a real lemon.

and please, find real dill. even if it's 8 months old and freezer burnt like mine. it's still good! right?

and ideally, it's best if you make this ahead of time, giving the flavours plenty of time to marry. but not so far ahead that it has to live in the fridge, because the texture is sublime when the potatoes are kept at room temperature.

  • 2 pounds potatoes, chopped and cooked
  • kosher salt and freshly ground black pepper, to taste. about a tsp of each.
  • 2 stalks celery, diced
  • 1/2 cup mayonnaise
  • 1/2 red onion, diced (about 1/2 cup)
  • 1/4 cup tightly packed, fresh dill, chopped
  • 1/2 lemon, zest and juice. (or more if you love lemon)
  • 1 heaping tbsp dijon mustard

DSC03297
never mind the vinegar, i pulled that out before i remembered that i cut it out. and i only used one of those lemons.

DSC03294
leave the skins on, please.

DSC03295
boil 'em up.

DSC03304
after draining, i return them to the pot that's still hot because it'll help evaporate any left over water.

DSC03301

i hope you have a microplaner or something similar, because the impact of fresh lemon zest cannot be understated. the finely diced onions are another nuance of this perfect salad. and in case the food network isn't your only reason for having a tv like it is mine, i'll break down the easy way of dicing an onion.

DSC03305
split it like this, and then peel the outer, inedible layers off, keeping the root intact.

DSC03309
make horizontal cuts, stopping before cutting all the way through.... the root is there to hold it all together, so don't cut through it.

DSC03310
make several vertical cuts across this way.

DSC03311
then finely, like this.

DSC03312
it may not have looked pretty, but the dill was still yummy.

DSC03315
i think i gave it another shot of dijon after this.

DSC03316
mix it all up.... and you would never know it's wasn't fresh dill.

DSC03318
and again.

DSC03319
PERFECT!